
LTspice is a SPICE-based analogue electronic circuit simulator computer software produced by semiconductor manufacturer Analog Devices (originally by Linear Technology).[1] It is the most widely distributed and used SPICE software in the industry.[2] Although LTspice is a great free-to-use SPICE software with many built-in models, the models are either generic models or Analog Devices specific components. You will need to import other manufacturers’ models into LTspice. In this post, I will discuss the import of the TINA-TI or PSpice model. If the model contains “SUBCKT”, you can easily do it.
Importing from PSpice
This import method is the easiest. Let’s follow the following steps:
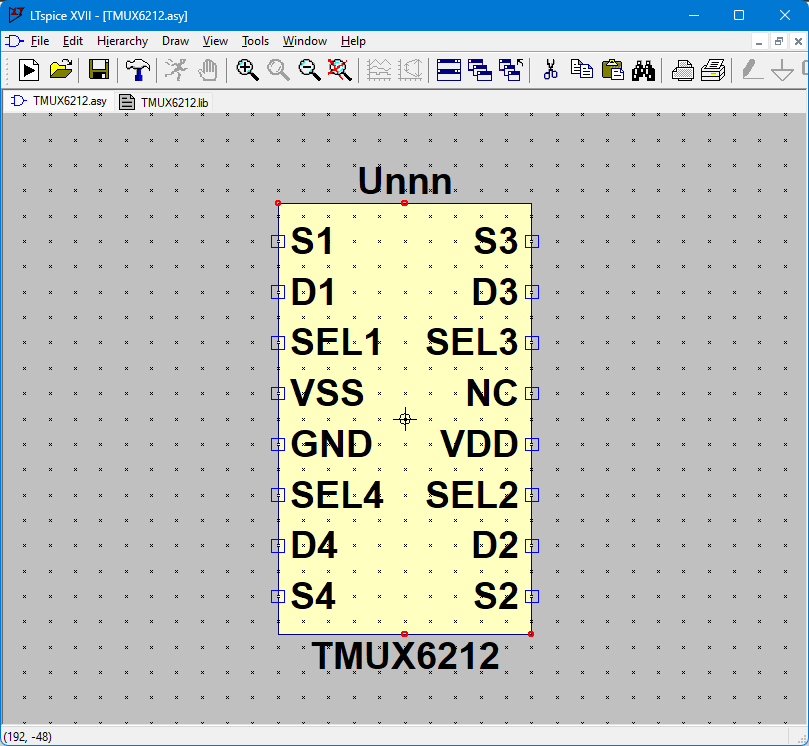
- Download the PSpice model from the manufacturer’s website. For this post, I will use TMUX6212 as an example.
- You will find a few files in the model compress file, but the only file of interest here is a .lib file. In this case, it is TMUX6212.lib.
- Open that file in LTspice.
- Highlight the component name besides “.SUBCKT”.
- Right-click and select “Create Symbol”.
- Click Yes.
- LTSpice will auto-generate the symbol with a “.asy” extension into the auto-generated folder of LTspice (C:\Users\user\Documents\LTspiceXVII\lib\sym\AutoGenerated). Take note that the path depends on your settings.
- You can feel free to re-arrange the symbol and save it.
- You can add the symbol from the component library to your schematic. Please test the model before using it. In my example, you can conduct simple tests like whether the logic, switching, and power rails work. You can also go deeper to test resistance and bandwidth. I will not discuss the testing method in this post.


Importing from TINA-TI
Before you begin, you need to ensure you have installed TINA-TI. If you have, you may proceed.
- A component page usually comes with a TINA-TI simulation reference design schematic to download. In my case, I will use MUX36D04 as an example.
- Downloading the reference design will give you “sbom969a.tsc”.
- Open that file in TINA-TI.
- Right-click on the model and select “Enter Macro”.
- This action will open the macro file. Now perform a “Save As”, and this will create a .cir file.
- Open the .cir file in LTspice.
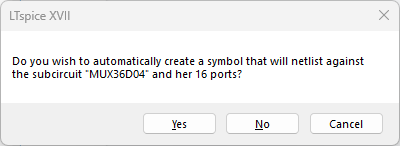
- Highlight the component name besides “.SUBCKT” and right-click. Then select “Create Symbol”.
- Click YES
- LTSpice will auto-generate the symbol with a “.asy” extension into the auto-generated folder of LTspice (C:\Users\user\Documents\LTspiceXVII\lib\sym\AutoGenerated). Take note that the path depends on your settings.
- You can feel free to re-arrange the symbol and save it.
- You can add the symbol from the component library to your schematic. Please test the model before using it. In my example, you can conduct simple tests like whether the logic, switching, and power rails work. You can also go deeper to test resistance and bandwidth. I will not discuss the testing method in this post.


How to make the model portable?
Occasionally, you want the imported model to be portable so that you can share the simulation schematic.
- Follow the above import instruction for either PSpice or TINA-TI.
- Go to the AutoGenerated folder and open the symbol file using a text editor.
- Remove the absolute path of the model file. I will modify the following line to “SYMATTR ModelFile TMUX6212.lib” in my example.
- This will change the symbol to read from the lib file within the same folder.
- Copy the model file into the same folder as the symbol. The model file can be either a .lib file or a .cir file, depending on where you import from.
- To use this symbol in your schematic, you need to place the schematic, symbol and model file into the same folder because the LTspice component select dialogue only shows two directories by default – your schematic directory and the installation component library directory.


I hope you will find this post useful in your simulation journey.
Kickstart Your Product Idea
As your strategic product partner, THESIS is always ready to help you innovate and value-add on your products.
Contact us:
contact@onethesis.com
www.onethesis.com
www.linkedin.com/company/onethesis
www.twitter.com/onethesistech
www.instagram.com/onethesis/
[1] “LTspice”. Analog Devices. Archived from the original on December 3, 2018.
[2] “LTspice XVII Introduction”. LTwiki. Archived from the original on December 2, 2018.